

| BMW Garage | BMW Meets | Register | Today's Posts | Search |

|
|
|
|
|||||||
Post Reply |
|
|
Thread Tools | Search this Thread |
| 01-10-2023, 10:26 AM | #23 |
|
New Member
0
Rep 24
Posts |
My next question is how to attach the new micro switch to the holder plate. Micro switch has two plastic rods sticking out to insert in the holes. Current microswitch looks like it was melted or glued into those holes. I am planning to melt the plastic at this point.
|
|
Appreciate
0
|
| 01-11-2023, 05:21 AM | #24 | |
|
Captain
 150
Rep 610
Posts
Drives: E89 Atacama Yellow 35is
Join Date: May 2022
Location: Scotland..Gods own country
|
Quote:
https://z4-forum.com/forum/viewtopic...tches#p1948939 Essentially for the micro switches you drill out the old screws if you cant unscrew them, having marked their positions first..then use short 5mm new screws to retain them..
__________________
Much modified 2011 Atacama Yellow 35is
previously a much modified 2012 Atacama Yellow 20i MSport
Change history here https://www.dropbox.com/s/8h1vabklgz...0List.pdf?dl=0 Build thread here https://z4-forum.com/forum/viewtopic.php?t=131886 |
|
|
Appreciate
0
|
| 01-11-2023, 08:14 AM | #25 | |
|
Call me "Dr. Bob"

128
Rep 401
Posts
Drives: BMW Z4 E89 sDrive 30i
Join Date: Jan 2018
Location: Munich, Bavaria (Home of BMW)
|
Quote:
The microswitches in the roof shell hardly ever fail. As re-mounting ist not so simple, avoid touching it.
__________________
Last edited by RobbiZ4; 01-11-2023 at 08:20 AM.. |
|
|
Appreciate
0
|
| 01-11-2023, 08:16 AM | #26 | |
|
Call me "Dr. Bob"
128
Rep 401
Posts
Drives: BMW Z4 E89 sDrive 30i
Join Date: Jan 2018
Location: Munich, Bavaria (Home of BMW)
|
Quote:
He's talking about the 2 microswitches melted into the roof shell.
__________________
|
|
|
Appreciate
0
|
| 01-11-2023, 10:03 AM | #27 | |
|
Captain
150
Rep 610
Posts
Drives: E89 Atacama Yellow 35is
Join Date: May 2022
Location: Scotland..Gods own country
|
Quote:
 
__________________
Much modified 2011 Atacama Yellow 35is
previously a much modified 2012 Atacama Yellow 20i MSport
Change history here https://www.dropbox.com/s/8h1vabklgz...0List.pdf?dl=0 Build thread here https://z4-forum.com/forum/viewtopic.php?t=131886 Last edited by B21; 01-11-2023 at 10:03 AM.. Reason: change |
|
|
Appreciate
1
RobbiZ4127.50 |
| 01-12-2023, 01:33 AM | #28 |
|
New Member
0
Rep 24
Posts |
I took the old micoswitch out, it got damaged during that process.I cut off some of the cable from that microswitch so now I see two wires coming from the plug. I couldn't get to the plug in the harness since it is at a tight place. I may need to cutoff some zipties and unwrap the cloth harness etc to get to it. Now I read that the plug may not be compatible. If that is the case maybe soldering to those wires may be an option. My new switch is made in 2022 and the old Switch is made in 2013. It is the same version and model. But plug may be different. The old microswitch has shorter mounting rods than the new switch. I tried to fit the new one into the holes the old one came out to check fit but it was too tight to align. Something in the front was blocking it. I may have to shorten those mounting rods. Also when I manage to put the new switch in those holes, how is it fixed there? Glue or Melting those plastic rods with soldering gun or micro torch?
|
|
Appreciate
0
|
| 01-12-2023, 02:27 AM | #29 |
|
Call me "Dr. Bob"
128
Rep 401
Posts
Drives: BMW Z4 E89 sDrive 30i
Join Date: Jan 2018
Location: Munich, Bavaria (Home of BMW)
|
As already written:
- it is not a fault of this switch - the new switch is correct, just mounting it is complex - the plug topic is regarding microswitch coupling locks and not a topic of your unnecessary damaged switch - no welding is required in the roof, as you got a new and correct plug As you continue asking but won't read any answers, I will stop any further comment. You are on the wrong page with your diagnose. |
|
Appreciate
0
|
| 01-12-2023, 04:44 PM | #30 |
|
New Member
0
Rep 24
Posts |
I put in the new micro switch. I unplugged the old one, plugged the new one in.
I was able to mount the new switch in by chopping of the half of the legs. Plug for the new microswitch and old one looked identical to the eye. Both black. Old plug had this number: 8 373 575-02 New plug had this number: 8 373 575-03 So the new micro switch is in. AT the CTM I removed the jump wire from the right switch and put the original pin in to socket 7 (for the left microswitch). And it didn't work. Unplugged it. And tested continuity between plugs 20 and 7 for the left microswitch and Multimeter beeped and displayed Short as it did before I replaced the switch. I also tested the ohms and I got 0.5 0.6 kOhms at the socket plug testing pins 20 to 7 unplugged. I put the hack jump wire back in from Pin 10 to Pin 7. The new microswitch is installed and plugged at its location but signal pin 7 is unplugged at the CTM, using the jumpwire from Socket 10 instead. So right now when the jump wire stays in place my car does not show any faults and raises the roof and closes it. Till I figure it out what else maybe wrong with the left switch? Is it the wire, alignments, plug etc. I would normally check a break in the wire first, but I am confused about the continuity between pins 7 and 20. If the wire was broken there should not be continuity there I thought. I like to redo the crimping on some of the wires on the CTM socket. I am not sure which one is the right one, so I ordered some of these to find out. 61-13-1-393-724 SOCKET TERMINAL MQS $0.47 30 $14.10 61-13-8-369-700 SOCKET TERMINAL MQS $0.87 6 $5.22 61-13-1-383-776 SOCKET TERMINAL MQS $0.61 10 $6.10 Last edited by okanfx; 01-12-2023 at 05:33 PM.. |
|
Appreciate
0
|
| 01-12-2023, 05:53 PM | #31 | |
|
New Member
0
Rep 24
Posts |
Quote:
So I have continuity because the wires were broken and touching each other where exposed causing the short/continuity? So I should have not even replaced the microswitch and check for broken/exposed wires like this first. Now I think I understand. Sorry RobbiZ4, I wish I caught this post correctly before I did replace the microswitch. I will check the wire next. Thank you very much. In my case I will look for the brown and white wire for the left switch in the harness to see if any of them exposed. |
|
|
Appreciate
0
|
| 01-12-2023, 09:08 PM | #32 |
|
New Member
0
Rep 24
Posts |
Yep, RobbiZ4 is right, it was the wires. They were broken near the plug, like an inch and a half away. I probably have replaced the micro switch for no reason. I think it was my misunderstanding of continuity read of the multimeter, I thought the wire was intact that is why I had continuity, but it was due to broken wires shorting each other as I understand now.
After soldering the 2 wires with some silicon wire little longer than necessary (for now) and wrapped them up with some velcro type roll. (for now). I tested the pins 7 and 20 unplugged again, and no short reading when I did continuity test, then I tested ohms when the roof was closed and I got 2.7kohm reading. That gave me courage to unplug the jumpwire and put in the original wire coming from the left microswitch in Pin 7. And it did work this time. I did a full opening a closing to make sure everything was working. Now, I used longer wire than I needed, and I did a quick wrapping of the wires to test. Since I don't have a battery maintainer, I was running the car when I was soldering the wires etc. So my plan is to take the car to someone who handles wiring harnesses, and wires and clean up the bad soldering and wire harnessing job I did. I think the new switch is ok, but I really didn't do anything to fasten it, just cut the legs and pushed it in flat the holding plate, that may also need better fixing when I redo the wire harnessing. Thank you very much, RobbiZ4, sorry for my misunderstanding. I spend an extra day and two changing that microswitch, and a lot of hours of frustrations, it was really difficult to replace that thing for me. |
|
Appreciate
0
|
| 01-12-2023, 09:24 PM | #33 |
|
New Member
0
Rep 24
Posts |
So this may be a quick check at the CTM socket with Multimeter Ohm setting, for left and right microswitches, no depinning necessary:
While the roof is closed/up: UnPlug the socket, for left side test pins 7(brown) and 20(white) for ohms, it should read 2.7kOhm. And the right side, pins 10(brown) to 23(brownGreen) should read 2.7kOhm. |
|
Appreciate
0
|
| 01-19-2023, 05:12 PM | #34 | |
|
New Member
0
Rep 24
Posts |
Quote:
61-13-1-383-776 resembles the original one. I think it is the same. 724 is pretty much the same size as 776 and looks almost identical. I might need to take a macro picture to see if there are any differences. 700 is larger then the other 2. I will clean up the wiring and SOCKET pins myself. Last edited by okanfx; 01-19-2023 at 09:15 PM.. |
|
|
Appreciate
0
|
| 01-20-2023, 03:00 AM | #35 | |
|
Call me "Dr. Bob"
128
Rep 401
Posts
Drives: BMW Z4 E89 sDrive 30i
Join Date: Jan 2018
Location: Munich, Bavaria (Home of BMW)
|
Quote:
It's absoultely important, that these pins stick with the complete length of their pins in the two small holes. To get this mounted, a nut from the mechanically locking system has to be removed.
__________________
|
|
|
Appreciate
0
|
| 01-23-2023, 05:48 PM | #36 | |
|
New Member
0
Rep 24
Posts |
Quote:
Will order those salmon relays next little. Not 100 percent sure which one is the right one. The original pin I took out only had the half length of the new microswitch's pins. That is why I chopped of the pins in the first place to match the original. Original pins were not sticking out, they were kinda melted to the plate as far as I can tell.  Last edited by okanfx; 01-24-2023 at 12:20 AM.. |
|
|
Appreciate
0
|
| 01-23-2023, 06:25 PM | #37 |
|
New Member
0
Rep 24
Posts |
|
|
Appreciate
0
|
| 02-04-2023, 04:26 PM | #38 |
|
New Member
0
Rep 24
Posts |
New plug broke in one week
I was not able to put plug for the microswitch high enough so the new plug coming from the microswitch snapped. I need to find a better location or add couple inches of extra wire. I kept the plug from the old switch, now will study what happened at try to plug in at a better location.
Wires snapped at the crimp pins Bottom of the pins still stuck to the wires where it snapped. Microswitch itself staying put as I installed it. Even with the plug cable pulling on it it didn't move. Last edited by okanfx; 02-04-2023 at 09:46 PM.. |
|
Appreciate
0
|
| 02-04-2023, 08:26 PM | #39 |
|
New Member
0
Rep 24
Posts |
I reinforced the old plug, probably will add another inch or two silicon wire and solder it to the snapped wires from the microswitch.
I have 15 more of these CableCoil Mini things I got from container store. I may add a few more of these. Probably other side of the plug coming from the CTM. And where I solder the snapped wires when I fix it tomorrow. Last edited by okanfx; 02-04-2023 at 09:52 PM.. |
|
Appreciate
0
|
| 02-05-2023, 05:01 PM | #40 | |
|
Second Lieutenant

50
Rep 297
Posts |
Quote:
Check your cars wiring. |
|
|
Appreciate
0
|
| 02-05-2023, 05:53 PM | #41 |
|
New Member
0
Rep 24
Posts |
I added 3 inches more wire to each wire. Wrapped them in a wire cloth tape. Put another WireCoil hugger thing on the other side of the plug.
At first try to I tied the loose wire somewhere at the top of the frame. That failed at first try causing plug to unplug itself this time without damage. I undid one of the ties on the loose cable and let it loose, so that did the trick. Happy now. I think adding some loose wire should take the stress out rest of the wires and heat shrunk solder points. I will let you know how long the fix lasts. I also replaced those salmon relays last week. The ones I ordered seems to be the correct ones. They shipped to Los Angeles quick. |
|
Appreciate
0
|
| 02-10-2023, 03:34 PM | #43 |
|
New Member
0
Rep 24
Posts |
I am back with a new fault.
A68c Hall Sensor, roof shell 2, packed Hoping it is the wires. Is there only one sensor on the roof shell 2 and is it on the right side? I think I was able to locate the sensor and the wires. Currently I can lift the roof 3 inches/10 centimeters. Tomorrow will try to find a broken wire. I may have to figure out how to raise the roof again if this 3inches won't let me follow that wire. Last edited by okanfx; 02-10-2023 at 09:48 PM.. |
|
Appreciate
0
|
| 02-11-2023, 02:06 AM | #44 |
|
Call me "Dr. Bob"
128
Rep 401
Posts
Drives: BMW Z4 E89 sDrive 30i
Join Date: Jan 2018
Location: Munich, Bavaria (Home of BMW)
|
Learn how to open the rear roof shell and to fix it in a professional way, as EACH E89 will run into these problems!
Remove the ceiling with your fingers only to not damage it. All 6 pins can be dismounted WITHOUT destroying it using a tiny 2mm screwdriver combined with a nail iron. Keep care, the ceiling is just thin cardboard. Very very carefully remove the 2 connectors of the window heating, as these can be partially torn off the glass! Always use 2 hands to support the contact on the glass and slowly unplug the connector by wiggling it. If teared off, it can be resoldered directly on the glass(!) with a heatgun (5mm nozzle!) with about 500°C. Not funny, not recommended, but I did it several times successfully. There are 2x2 big screws vertically on top of the ceiling, 2 screws horizontally on both sides. Each position of it's heads have to be surrounded with a white Edding pen before touching. Always use a heat gun with a 5mm nozzle and about 180°C to heat each of these 6 screw cores before attempting to loosen it. If not, it may torn!!!! Repair all 2+4 wires on both sides and stabilize the broken hydraulic hoses with a self welding tape. Important! Try to restore the original way of assembly, don't reinvent the wheel or add your own wire loops. Every detail in the OEM assembly has a special reason and should not be altered. Each cable tie is important in its original position and even the orientation of the zipper head! Each tape as well. Don't be creative and take photos, photos, photos before touching anything! Finally, remount it with 6 new original screws from BMW (25€), don't use Loctite or a similiar glue. A more detailled description can be found here: https://z4-forum.com/forum/viewtopic.php?t=122363 Last edited by RobbiZ4; 02-11-2023 at 04:21 AM.. |
|
Appreciate
0
|
Post Reply |
| Bookmarks |
|
|


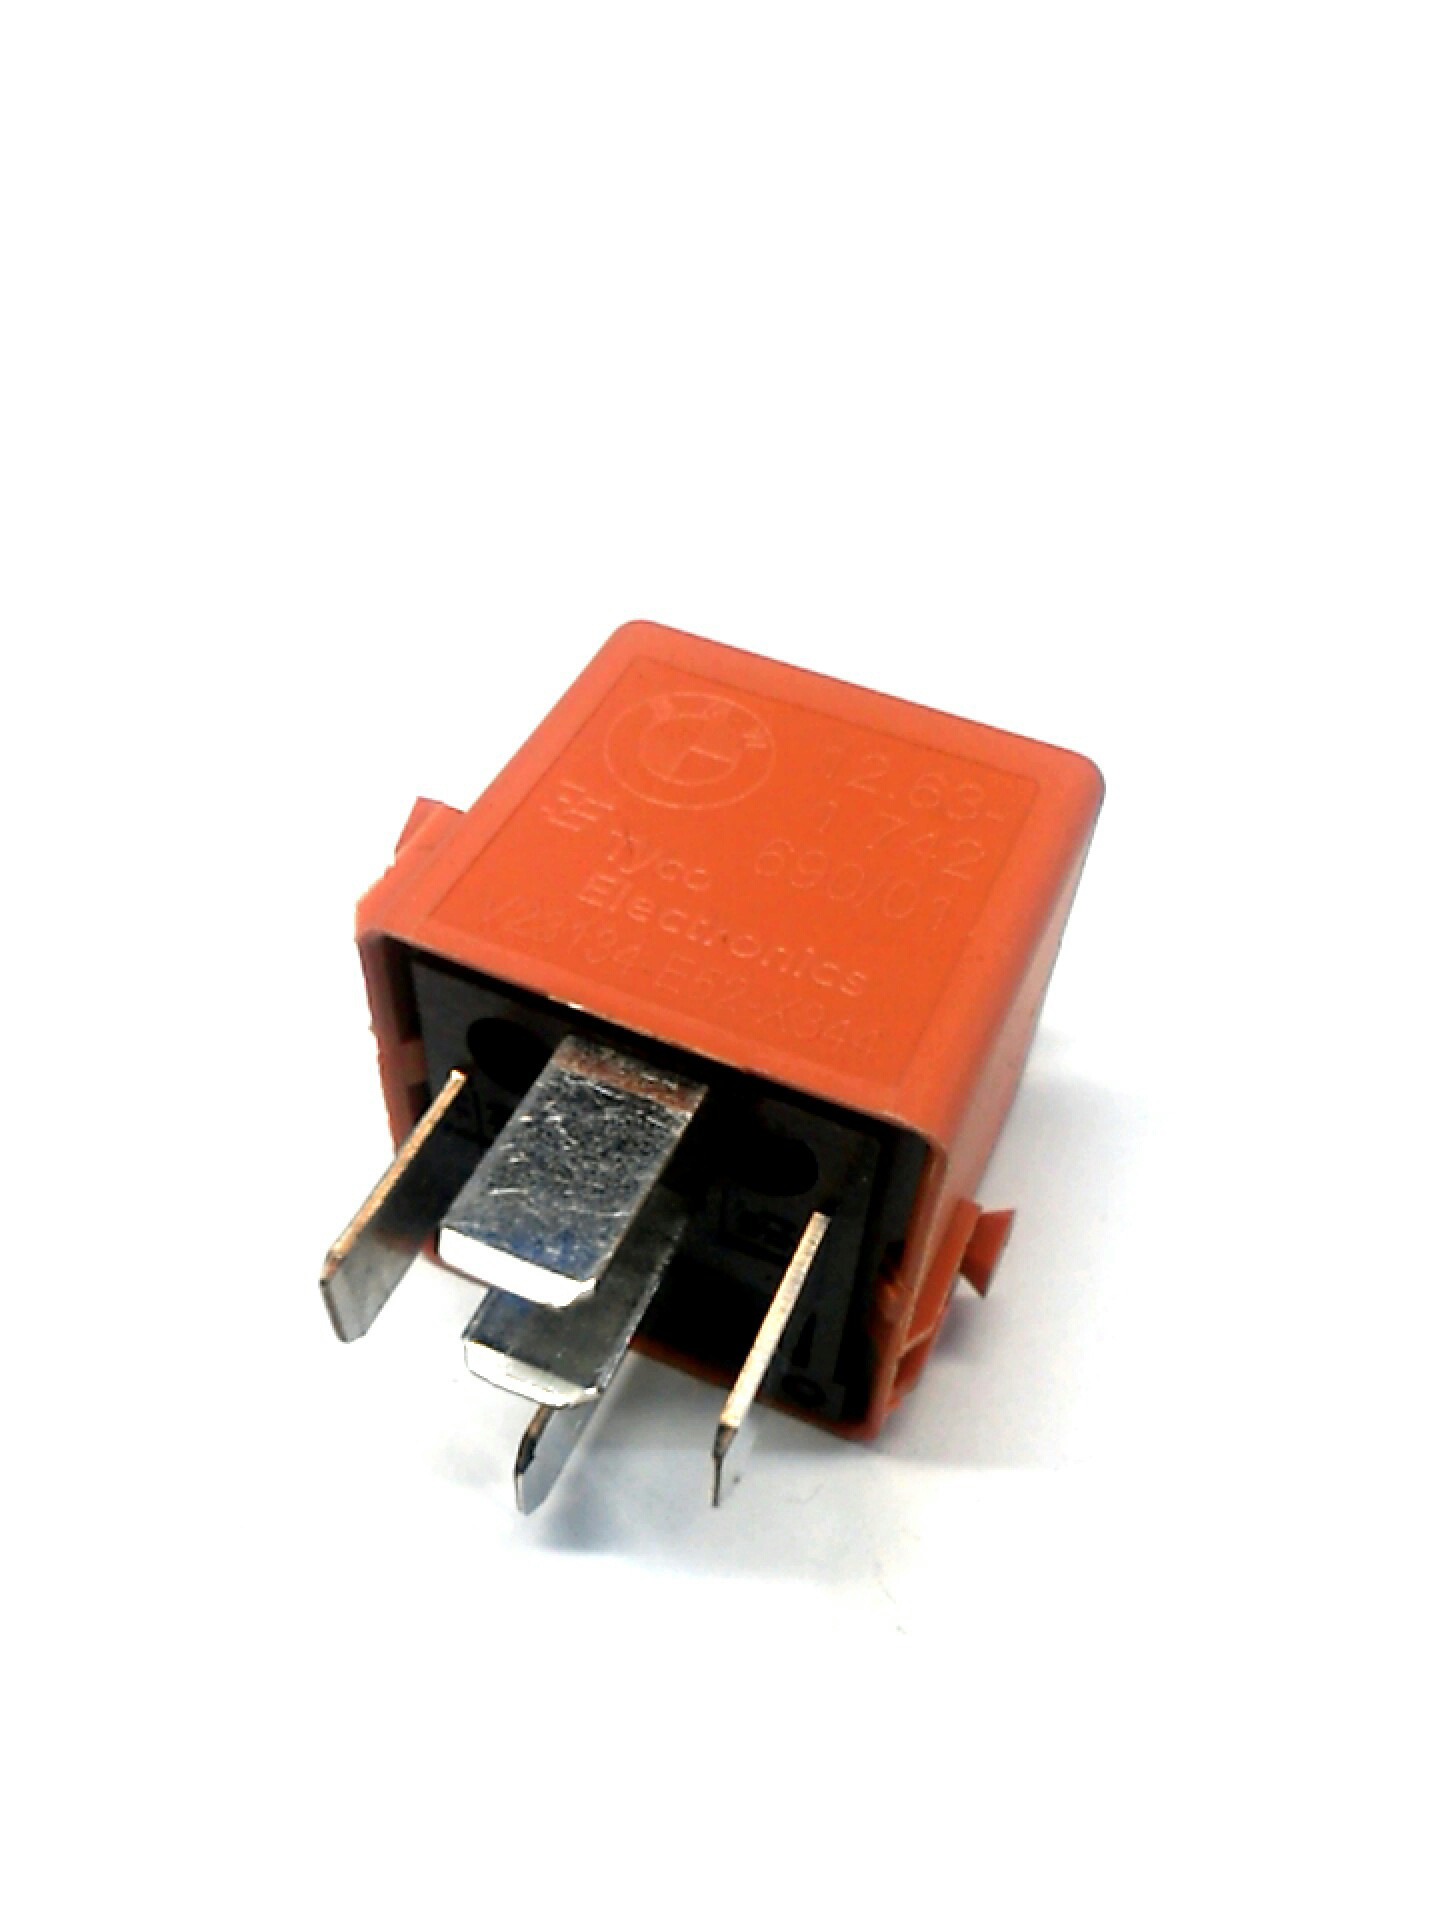 I ordered 2 of these Salmon Relays.


